Over my few years of doing genealogy I have found only one website which I feel the need to pay a membership; www.geni.com. There are a few reasons why I enjoy this website so much; The format of the website makes it much easier to find matches, exploring the tree is very simple, and it is easy to get down. When I first began my research I tried to build a small tree on Ancestry.com but found in my trial of the website that it was quite confusing just to get in contact with a relative. I also hated the format of the tree because it kept it in a two-dimensional format. While there may have been changes over the years since I last used ancestry I quickly found that geni.com gave me the tools I needed.
As many genealogist come to find out quite quickly, family trees are not 2, 3, or even 4-dimensial. They are infinitely dimensional; each person has a tree unique to only them with only a small percentage of their tree similar to those of blood origin (similar to the amount of shared DNA between relatives). The program geni.com has created for their tree format allows you to easily move from one dimension of the tree to another dimension of the tree. The basics of the tree are pretty easy to understand and the tutorials on this are plenty (a good video for beginners http://www.youtube.com/watch?v=I4VkZHcNu1o), but there aren't a lot of tutorials or explanations about how to explore and edit the tree beyond the basics.
So assuming you have a basic working knowledge of geni (if not, watch the video above and spend some time on the site to get a basic understanding), I will go into some simple features many people overlook.
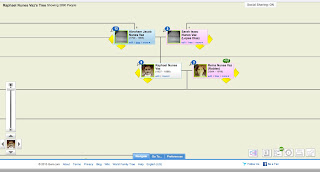 When you first open the tree window you will automatically be the focal person in the tree. For our example we will use Raphael Nunes Vaz. Within the tree each person is represented by what is called a 'node', with multiple links available at the bottom of each node. Clicking the "tree" link on a person's node will make them the focal point of the tree. Each node will have yellow arrows pointing either up, down, left, or right. Clicking an up arrow will add a parent, clicking the down arrow will add a son or daughter, clicking the left or right arrow will add a sibling or a spouse. Some nodes (such as Reina Nunes Vaz') will also have a small tree above it with a number; the number indicates how many people are in that person's tree who aren't visible in the current tree. Clicking on the small tree above the node will make that person the focal point of the tree.
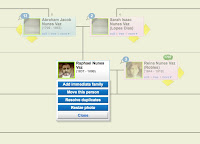
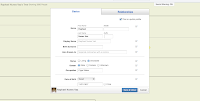 The edit link will cause a pop-up window to appear (pictured on the left) with Basics editing options and Relationship editing for that person. Basics is the automatic window but if you click on the relationship tab you can easily change parents if there is a mistake as well as editing dates and information for any spouses. There is also the option to change the spouse status to husband/wife, fiancè, ex-husband/wife (divorced), and ex-partner. The third link is the 'more' link which will show the following options when clicked (as shown above on right); add immediate family, move this person, resolve duplicates, send message, and resize picture.
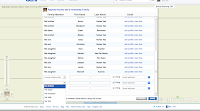 The "add immediate family" link brings up a page (shown on the right) which allows you to enter in multiple immediate family members at once(parents, siblings, spouses, and children) and also allows you to edit the already added immediate family members. The "move this person" link allows you to merge duplicate profiles and clicking the link will cause a mini-window to open with the a duplicate node (shown below), this window with an extra node will stay open even as you select other nodes to become the
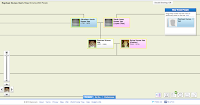 focal point of the tree. Once you have found the duplicate profile within the tree just drag the node from the other window over the duplicate profile. A window will pop-up asking what the relation of the one profile is to the other. The "resolve duplicates" link will open a window which allows you to quickly merge any duplicated immediate family members. Simply drag a duplicate profile over another duplicate and it will link them together. Clicking the "send message" link will allow you to either send a message to the person (if they accessed their profile) or the page manager.
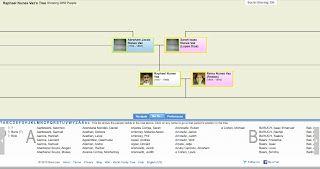
When looking at your tree at the bottom of the page you will notice 3 blue tabs; Navigate, Go To..., and Preferences. The "Navigate" tab gives you an eagles eye view of the whole tree as best possible (shown on the right), allowing you click on the section of the tree you'd like to go to. The "Go To..." tab gives you a list of all the names of the profiles being shown in this setup of the tree. The "Preferences" tab gives you many different options on how you would like to view your tree.
Display
With the "Preferences" tab there are 4 sections; Display, Names, Revision, and Advanced. Under "Display" you can choose how many generations of ancestors you would like to show and how many generations of descendants you would like to show (it goes from 0-20 and then goes to All). There is also a checkbox for "direct ancestors only". Checking this box will make the view of the tree only show ancestors of the selected person, taking out any ancestor siblings or unrelated spouses from view.
It will still show any descendants of the selected person
In the middle of the display tab are 4 different options of the Tree Diplay; Standard, Vertical, Photos Only, and Names Only. The last options with the Display tab is layout options, each being a check-box; Show Photos, Flip Nodes (this means when you scroll over a node in the tree an information window about that person will pop-up), Click to Flip Nodes (Flip Nodes must be already selected), Show Yellow Arrows (the arrows all you to add family members), Show Email Prompt (will give a space in the node to enter the email of the person if they are listed as alive), Center Single Parents, Mark Deceased, Neutral Color Backgrounds, and Open Profile in New Windows (when selected this opens a new window when you click on a node to look at the person's profile).
Names and Revision
The names link is a series of check-boxes which affects the information given on each node. The options under this link are in two columns; one which you can only select one option, the other with multiple options. The first column affects the display of birth names in the tree; Do not display birth surnames, birth surname instead of last name, birth surname instead of last name in Caps, birth surname appended, in parenthesis (tree only). The second column affects how the name is displayed in each node; Ignore display name, Show Suffixes, Show middle names, Do not guess last names, and reverse RTL names (used for names in Hebrew/Arabic).
The Revision link allows you to change the display of revision history of the tree. You can see the revision history of each profile under the revisions tab within the person's profile page.
Advanced
These options allow you to change the physical view of the tree; Font size, Date format, and Rendering quality. All of these options are more for personal preference, so you can play around with it and see what you like best.
As many genealogist come to find out quite quickly, family trees are not 2, 3, or even 4-dimensial. They are infinitely dimensional; each person has a tree unique to only them with only a small percentage of their tree similar to those of blood origin (similar to the amount of shared DNA between relatives). The program geni.com has created for their tree format allows you to easily move from one dimension of the tree to another dimension of the tree. The basics of the tree are pretty easy to understand and the tutorials on this are plenty (a good video for beginners http://www.youtube.com/watch?v=I4VkZHcNu1o), but there aren't a lot of tutorials or explanations about how to explore and edit the tree beyond the basics.
So assuming you have a basic working knowledge of geni (if not, watch the video above and spend some time on the site to get a basic understanding), I will go into some simple features many people overlook.
Nodes
 When you first open the tree window you will automatically be the focal person in the tree. For our example we will use Raphael Nunes Vaz. Within the tree each person is represented by what is called a 'node', with multiple links available at the bottom of each node. Clicking the "tree" link on a person's node will make them the focal point of the tree. Each node will have yellow arrows pointing either up, down, left, or right. Clicking an up arrow will add a parent, clicking the down arrow will add a son or daughter, clicking the left or right arrow will add a sibling or a spouse. Some nodes (such as Reina Nunes Vaz') will also have a small tree above it with a number; the number indicates how many people are in that person's tree who aren't visible in the current tree. Clicking on the small tree above the node will make that person the focal point of the tree.
 The edit link will cause a pop-up window to appear (pictured on the left) with Basics editing options and Relationship editing for that person. Basics is the automatic window but if you click on the relationship tab you can easily change parents if there is a mistake as well as editing dates and information for any spouses. There is also the option to change the spouse status to husband/wife, fiancè, ex-husband/wife (divorced), and ex-partner. The third link is the 'more' link which will show the following options when clicked (as shown above on right); add immediate family, move this person, resolve duplicates, send message, and resize picture.
 The "add immediate family" link brings up a page (shown on the right) which allows you to enter in multiple immediate family members at once(parents, siblings, spouses, and children) and also allows you to edit the already added immediate family members. The "move this person" link allows you to merge duplicate profiles and clicking the link will cause a mini-window to open with the a duplicate node (shown below), this window with an extra node will stay open even as you select other nodes to become the
  focal point of the tree. Once you have found the duplicate profile within the tree just drag the node from the other window over the duplicate profile. A window will pop-up asking what the relation of the one profile is to the other. The "resolve duplicates" link will open a window which allows you to quickly merge any duplicated immediate family members. Simply drag a duplicate profile over another duplicate and it will link them together. Clicking the "send message" link will allow you to either send a message to the person (if they accessed their profile) or the page manager.
Tree Preferences

When looking at your tree at the bottom of the page you will notice 3 blue tabs; Navigate, Go To..., and Preferences. The "Navigate" tab gives you an eagles eye view of the whole tree as best possible (shown on the right), allowing you click on the section of the tree you'd like to go to. The "Go To..." tab gives you a list of all the names of the profiles being shown in this setup of the tree. The "Preferences" tab gives you many different options on how you would like to view your tree.
Display
With the "Preferences" tab there are 4 sections; Display, Names, Revision, and Advanced. Under "Display" you can choose how many generations of ancestors you would like to show and how many generations of descendants you would like to show (it goes from 0-20 and then goes to All). There is also a checkbox for "direct ancestors only". Checking this box will make the view of the tree only show ancestors of the selected person, taking out any ancestor siblings or unrelated spouses from view.
It will still show any descendants of the selected person
In the middle of the display tab are 4 different options of the Tree Diplay; Standard, Vertical, Photos Only, and Names Only. The last options with the Display tab is layout options, each being a check-box; Show Photos, Flip Nodes (this means when you scroll over a node in the tree an information window about that person will pop-up), Click to Flip Nodes (Flip Nodes must be already selected), Show Yellow Arrows (the arrows all you to add family members), Show Email Prompt (will give a space in the node to enter the email of the person if they are listed as alive), Center Single Parents, Mark Deceased, Neutral Color Backgrounds, and Open Profile in New Windows (when selected this opens a new window when you click on a node to look at the person's profile).
Names and Revision
The names link is a series of check-boxes which affects the information given on each node. The options under this link are in two columns; one which you can only select one option, the other with multiple options. The first column affects the display of birth names in the tree; Do not display birth surnames, birth surname instead of last name, birth surname instead of last name in Caps, birth surname appended, in parenthesis (tree only). The second column affects how the name is displayed in each node; Ignore display name, Show Suffixes, Show middle names, Do not guess last names, and reverse RTL names (used for names in Hebrew/Arabic).
The Revision link allows you to change the display of revision history of the tree. You can see the revision history of each profile under the revisions tab within the person's profile page.
Advanced
These options allow you to change the physical view of the tree; Font size, Date format, and Rendering quality. All of these options are more for personal preference, so you can play around with it and see what you like best.
Tips
One of the best ways to really get used to the format is to play around with the tree and try to build it up to the point that you are able to merge with other trees on geni. Just viewing each tree from the focal point of all your different relatives can give you a great idea of how the program works. The help section on geni.com (http://help.geni.com/home) is very helpful and includes a whole community of experienced genealogists.
*A quick side-note that as you get into the more advanced options you may be limited if you have the Basic account. Differences between the types of accounts can be seen here.
*A quick side-note that as you get into the more advanced options you may be limited if you have the Basic account. Differences between the types of accounts can be seen here.

